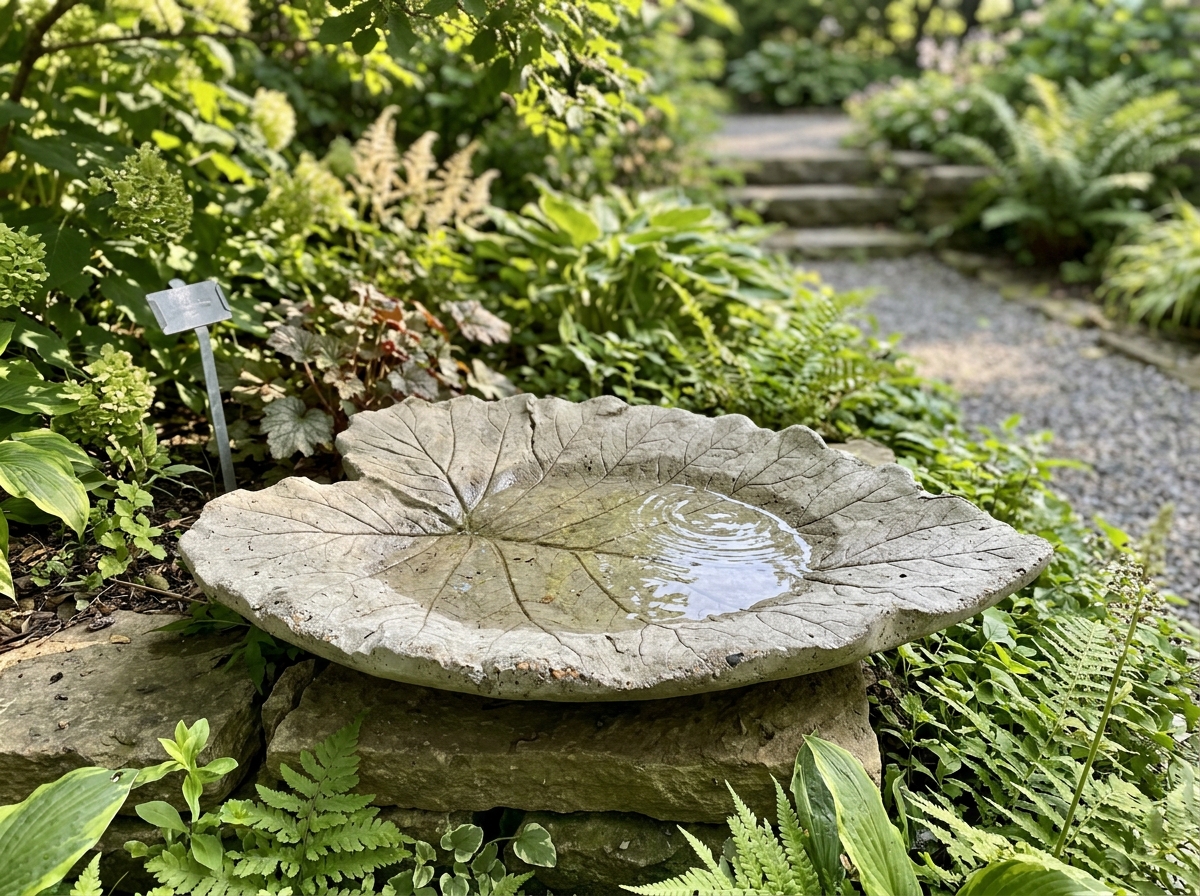
An elephant ear bird bath is exactly what it sounds like: a wide, shallow basin inspired by (or actually cast from) the giant leaves of elephant ear plants like Colocasia or Alocasia. The leaf's naturally cupped shape, prominent veins, and broad surface make it a perfect mold for a concrete or hypertufa basin that looks like it grew in your garden. You can also skip the real leaf entirely and use a large plastic or ceramic bowl shaped to mimic that same wide, gently-curved form. Either way, the goal is the same: a naturalistic, low-profile water dish that birds will actually use. This guide walks you through the whole process from picking your materials to getting your first robin to splash around in it.
How to Make Elephant Ear Bird Baths: Step by Step

Marcus Henley
22 Mar 2026
What an elephant ear bird bath is and what you'll need
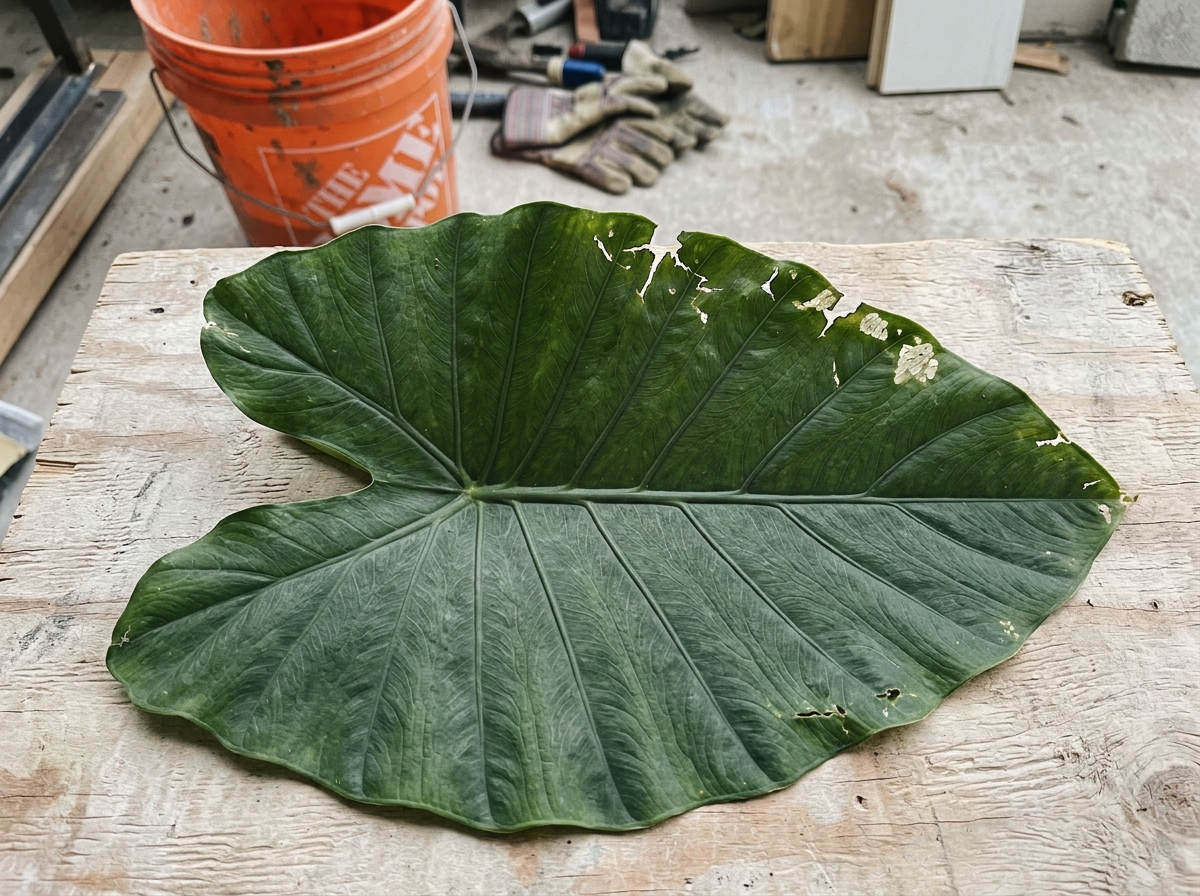
The classic version of this project uses a fresh elephant ear leaf as a one-time mold. You press a concrete or hypertufa mix into the upward-facing underside of the leaf, let it cure, then peel the leaf away. What's left is a basin with the leaf's vein texture imprinted into the surface, which is both beautiful and functional because that texture gives birds a non-slip foothold. If you can't get a real leaf, you can carve or sculpt the shape using a large mixing bowl as your mold instead, or buy a pre-formed elephant-ear-style basin and simply mount and finish it yourself.
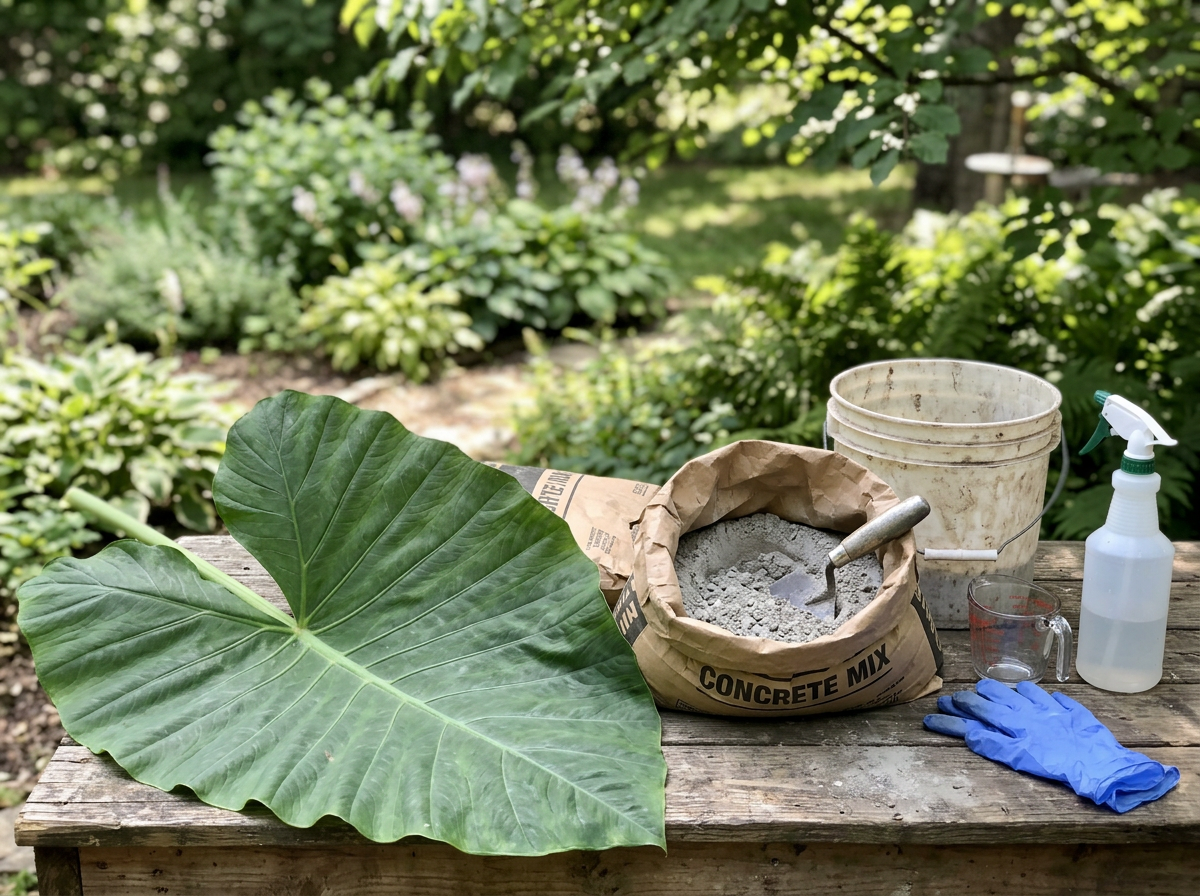
Here's what you'll need for the concrete-leaf version, which is the most satisfying and most durable approach:
- One large, healthy elephant ear leaf (Colocasia or Alocasia), at least 18 to 24 inches wide — bigger is better for birds
- Portland cement or a pre-mixed hypertufa blend (cement, peat moss, and perlite in roughly equal parts by volume)
- Sand (for a smoother, denser mix) or perlite (for a lighter, more porous mix)
- Water for mixing
- Plastic sheeting or a garbage bag to lay the leaf on
- A mound of sand, soil, or crumpled newspaper to support the leaf in a slight bowl shape while you work
- Rubber or latex gloves — fresh concrete is caustic
- A stiff brush for texturing
- Aquarium-safe silicone sealant for sealing any cracks after curing
- A stable base: a flat stump, upturned pot, or decorative pedestal
One important heads-up: live elephant ear plants (Colocasia and Alocasia) contain insoluble calcium oxalates and are listed by the ASPCA as toxic to pets. The leaf you're using is just a mold, so birds won't be drinking from anything plant-derived, but keep the raw leaves away from dogs and cats while you work, and wash your hands well after handling them.
Choosing the right leaf and basin size
Leaf size determines basin size, and basin size is one of the most important variables for whether birds actually use the bath. Audubon recommends keeping the water depth at 1 to 1.5 inches for most small birds, and no deeper than 2 to 3 inches at the very deepest point for larger visitors like robins and jays. If the water is too deep, birds will skip it entirely. So you want a leaf that's wide and naturally shallow at the center when cupped, not one that droops into a steep, narrow bowl.
For a practical guide: a leaf that's 18 to 24 inches across will give you a finished basin of roughly 14 to 20 inches at the widest point after shrinkage and edge trimming. That's a generous size for multiple birds at once. Anything smaller than 12 inches finished diameter starts to feel cramped. If you're working from a mold bowl instead of a real leaf, choose a wide, flat bowl (like a large mixing bowl turned upside down) rather than a deep salad bowl.
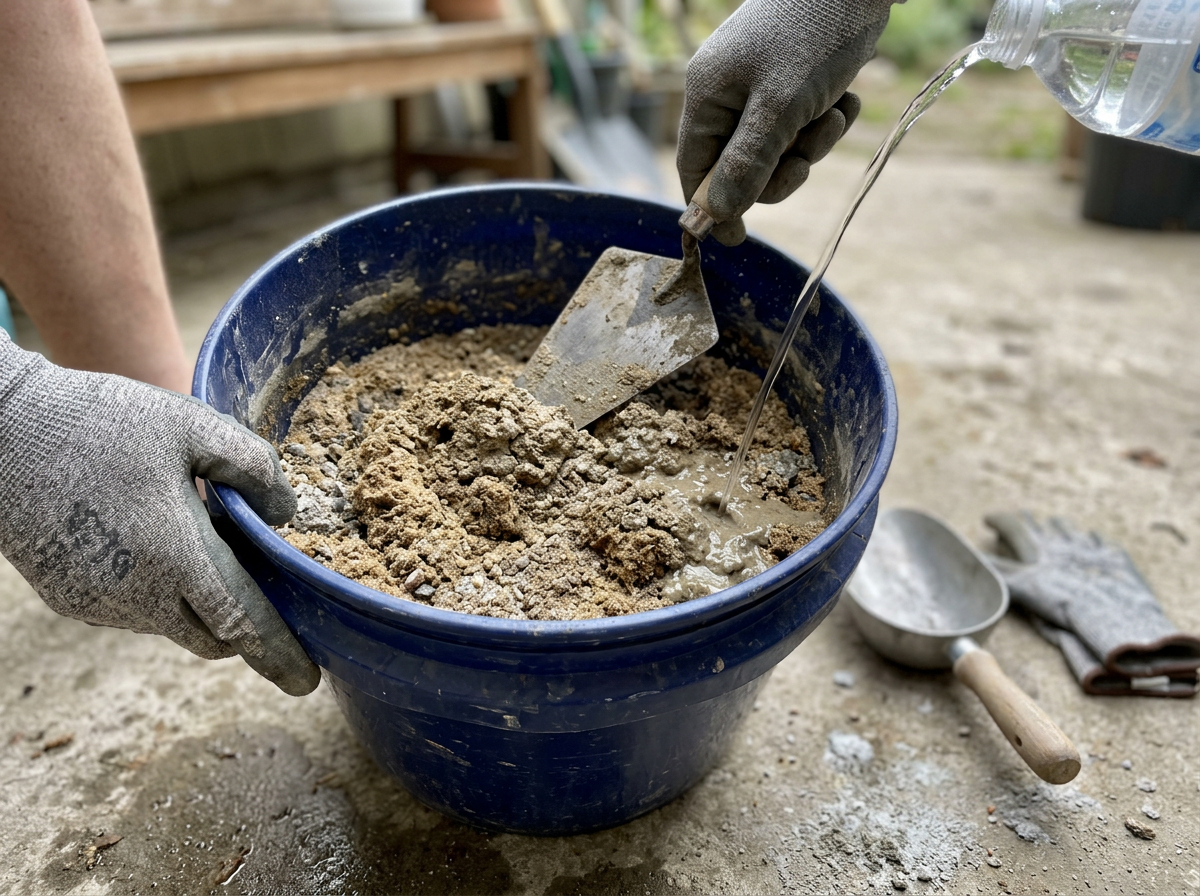
For the concrete mix, a basic hypertufa ratio of 1 part Portland cement, 1.5 parts peat moss, and 1.5 parts perlite works well and keeps the finished piece light enough to move around. If you want something denser and smoother, swap perlite for coarse sand. Either way, you're aiming for a mix that's roughly the consistency of thick peanut butter: firm enough to hold its shape when pressed, wet enough to pick up the leaf detail.
How to build it: step by step
Prepping your workspace and the leaf
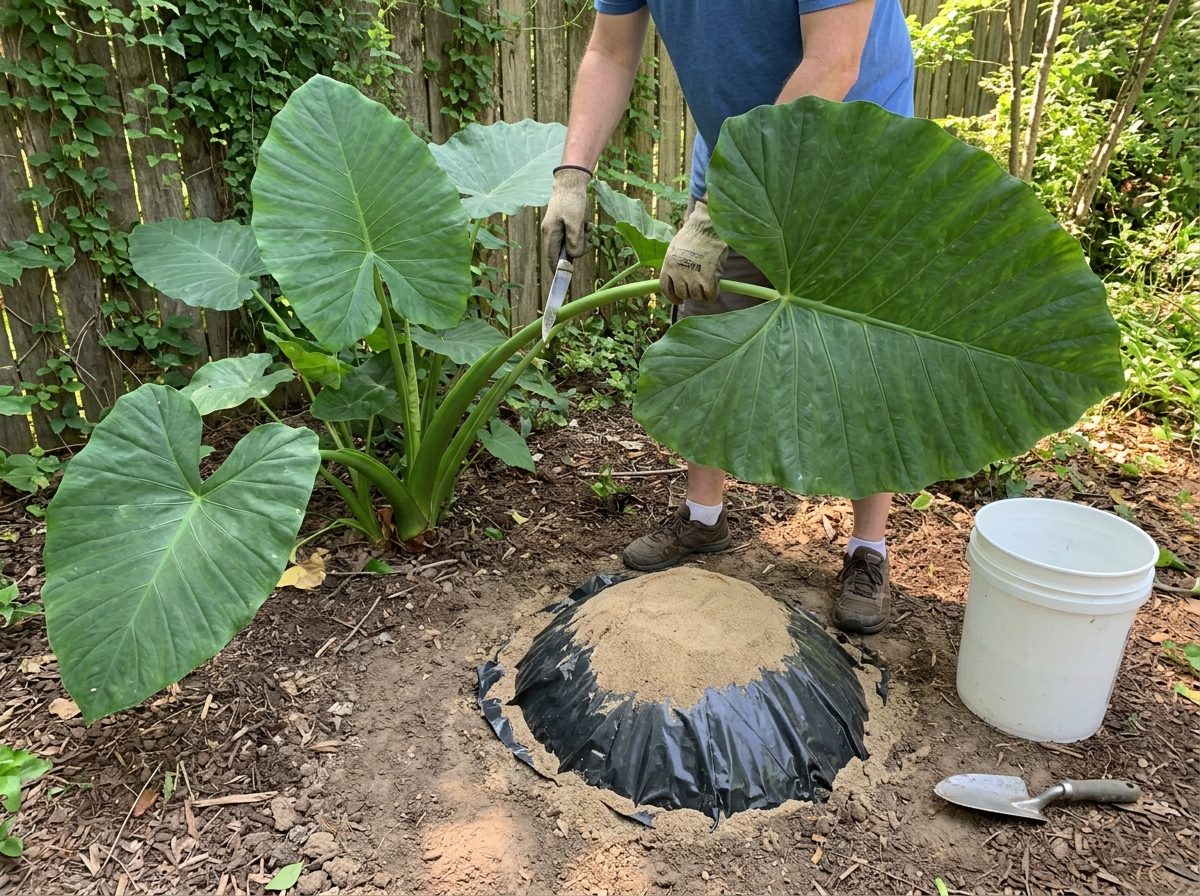
- Pick your leaf in the morning when it's fresh and pliable. Lay it vein-side up on a flat surface first and look it over for tears or thin spots that might let concrete bleed through.
- Lay a sheet of plastic on the ground or on a table, then mound up sand or crumpled newspaper underneath the plastic to create a gentle dome shape about 3 to 4 inches tall at the center. This is what gives your basin its cupped form.
- Place the leaf vein-side up over the mound, letting the edges droop naturally. The underside of the leaf (the side facing up) is your working surface.
- Lightly mist the leaf with water. This helps the concrete release cleanly later and reduces the chance of the mix drying out too fast at the surface.
Mixing and applying the concrete
- Mix your hypertufa or cement blend in a bucket until uniform, then add water slowly. You want a firm, moldable consistency, not soupy.
- Starting from the center of the leaf, press the mix down in an even layer about 1.5 to 2 inches thick. Work outward toward the edges. Thinner than 1 inch and the basin will be fragile. Thicker than 2.5 inches and it becomes unnecessarily heavy.
- Stop about 1 to 2 inches from the leaf edge, or fold any overhanging leaf up and over the concrete edge to create a natural-looking lip.
- Use a gloved hand or a stiff brush to press the mix firmly into the leaf veins. The more contact, the better the imprint.
- Check that your depth profile is right: the center should be the highest point (sitting on your dome mound), and the edges should slope gently down so water collects in a shallow bowl shape. You're aiming for a maximum water depth of about 2 inches at the lowest points.
- Cover loosely with plastic sheeting to slow the cure. Let it sit undisturbed for at least 24 hours. Full cure takes about 28 days, but it will be firm enough to handle after 48 to 72 hours.
Removing the leaf and finishing
- After 48 hours, carefully flip the basin over. The leaf will have dried and may start to peel away on its own. If not, gently pull it off. Any stuck bits will decompose or scrub off with a brush.
- Let the basin cure in a shaded, damp spot for at least one to two weeks. Mist it with water daily during curing to prevent cracking.
- Inspect for cracks or thin spots. Small surface cracks are normal and usually seal on their own, but any through-cracks need to be filled with aquarium-safe silicone sealant rated for water contact. Let the sealant cure fully (usually 24 hours) before filling with water.
- Before putting it out for birds, leach the concrete by filling it with water and letting it sit for a week, then dumping and refilling. Fresh concrete is highly alkaline and can raise the pH of the water to harmful levels. Repeat this two or three times. Some builders paint the interior with a concrete sealer rated for water contact to speed this up.
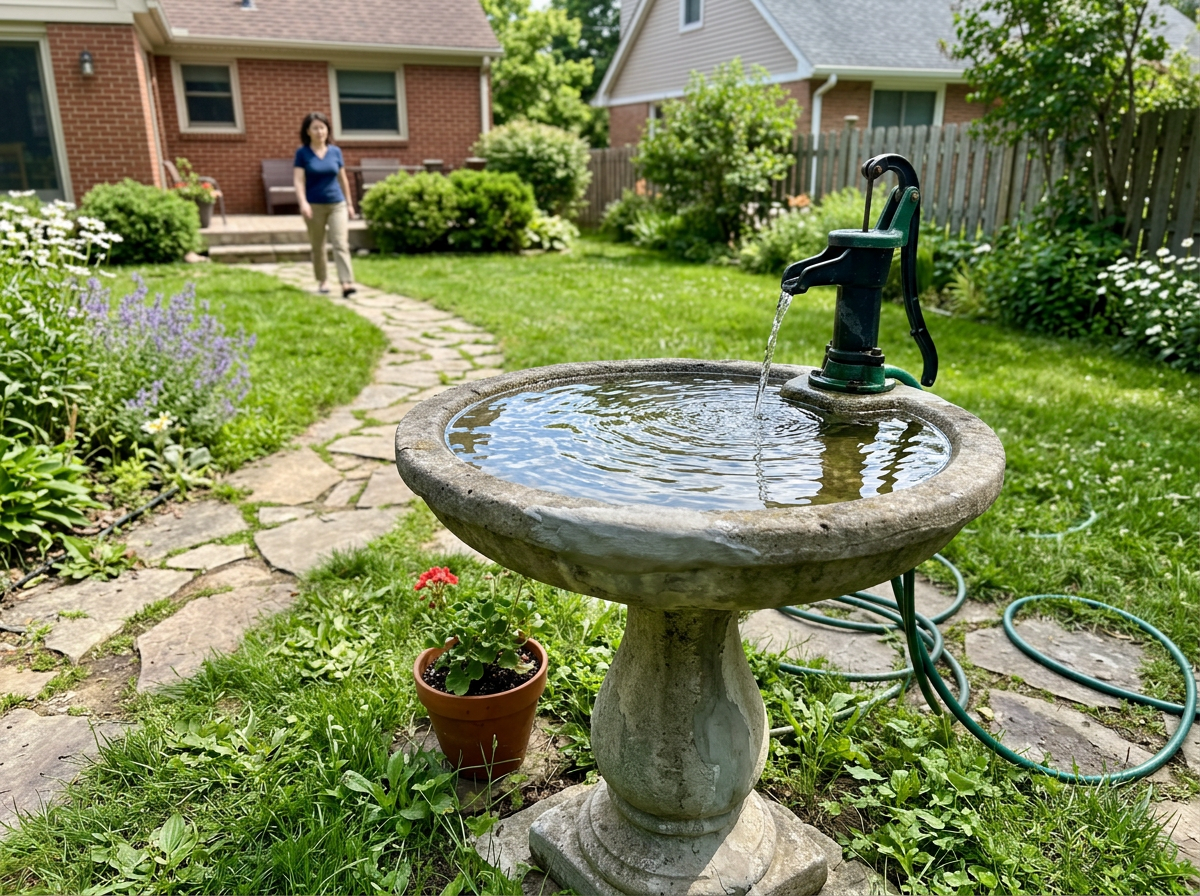
Where to put it: placement and setup
Placement makes the difference between a bath that gets used daily and one that sits ignored. Birds need to feel safe while they're bathing because wet feathers temporarily limit their ability to fly. That means your bath should be in a spot where birds have a clear sightline in all directions, not tucked under a dense shrub where a cat could hide.
Audubon's guidance specifically calls for locating baths some distance from dense ground cover to reduce predator ambush risk. A good rule: place the bath at least 10 feet from the nearest shrub or dense planting. At the same time, there should be a perch nearby, like a fence post, branch, or shepherd's hook, where birds can land and survey the area before dropping down to bathe. Aim for perches within 5 to 10 feet of the bath.
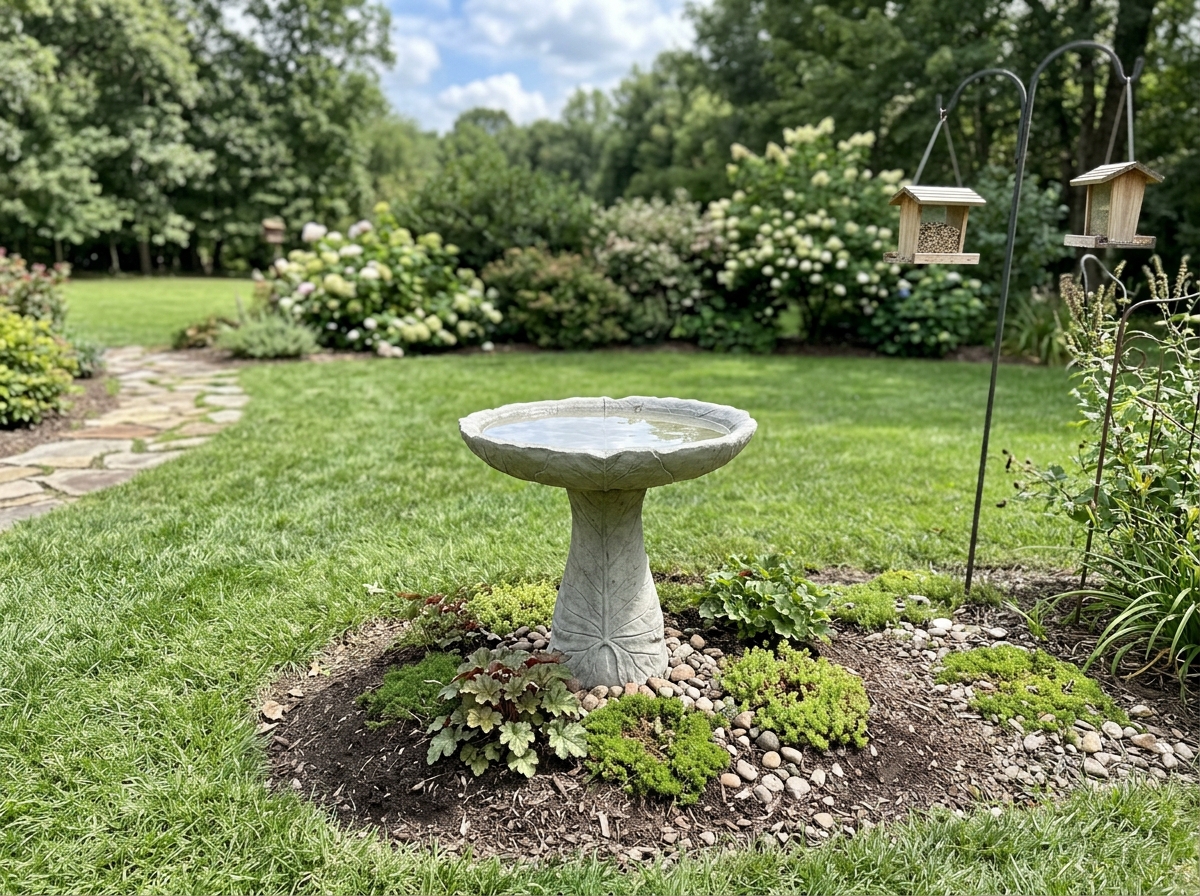
For the base, set your basin on a stable, level platform. A flat stump is a natural-looking choice that fits the aesthetic of this style. A stack of flat stones works too. The basin should sit at roughly 2 to 3 feet off the ground, which gives ground-feeding birds easy access while keeping it visible from your window. If you want it at ground level, that works as well and is actually preferred by some species, but you'll want extra vigilance about cats.
Add a handful of smooth river stones or pebbles to the bottom of the basin. This serves two purposes: it gives birds a textured footing (the NWF specifically recommends a textured interior for this reason), and it raises the effective floor slightly so you can keep water depth at the ideal 1 to 1.5 inches without the basin looking empty. The leaf-vein texture already helps with grip, but the stones make it even more inviting.
Filling, cleaning, and keeping the water fresh
Fill the basin to about 1 to 1.5 inches deep. For larger birds like robins or doves, you can go up to 2 inches at the deepest point, but don't exceed that. Top it up daily in hot weather because shallow basins evaporate quickly. In summer, plan to refill every one to two days.
Cleaning is non-negotiable. Bird baths accumulate algae, biofilm, feathers, and droppings fast, and a dirty bath can spread disease among your visitors. The basic schedule: dump, scrub, and refill at least once a week. For routine cleaning, a stiff brush and plain water is usually enough. For a deeper clean, Audubon recommends a 9:1 mix of water to white vinegar, scrubbing the basin thoroughly, then rinsing well before refilling.
For a more thorough disinfecting session (every two to four weeks), some birders use a dilute hydrogen peroxide solution. If you go this route, rinse the basin extremely thoroughly afterward and let it air dry before refilling. Residual cleaner is the risk here, not the method itself. The key step is always the final rinse: rinse, rinse, and rinse again.
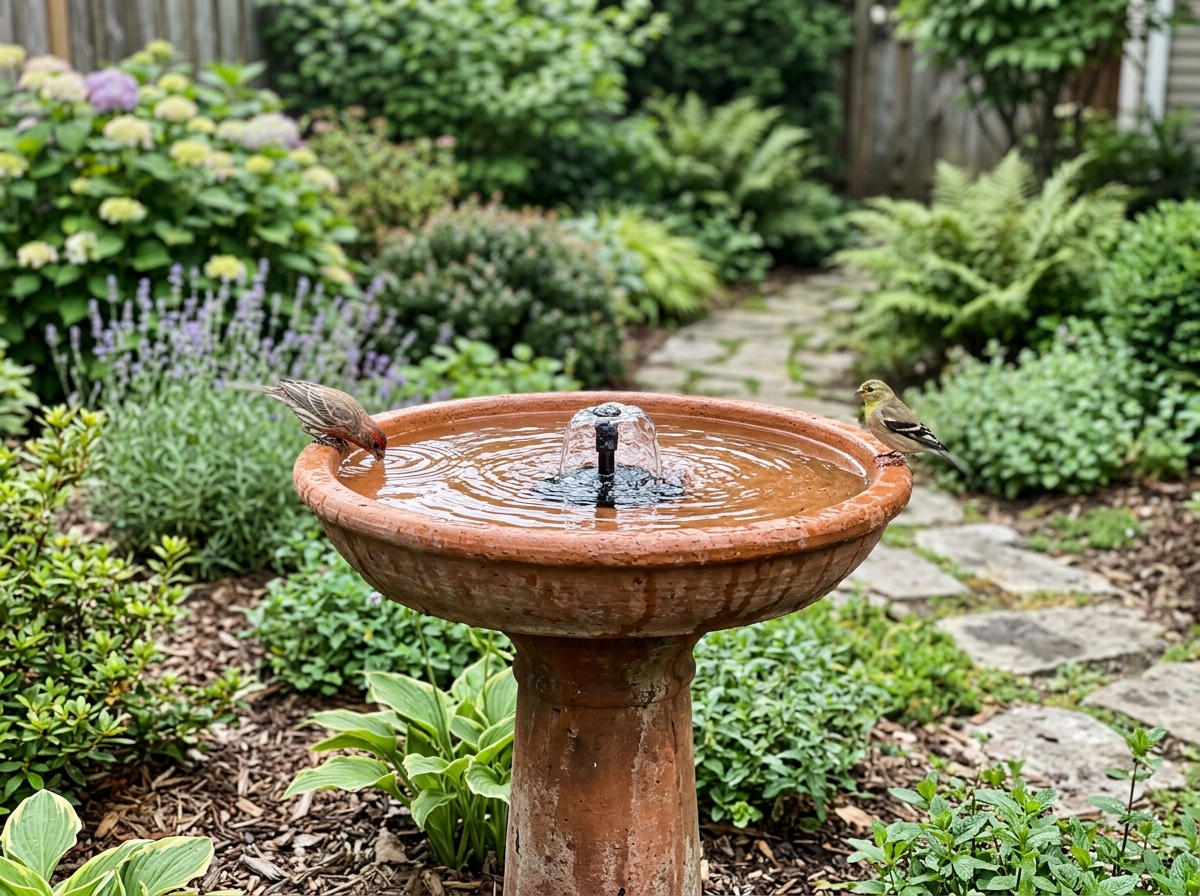
Don't let standing water sit for more than two days without refreshing it, especially in warm weather. Stagnant water breeds mosquito larvae and algae fast. A simple solar-powered dripper or wiggler attachment costs under $20 and keeps water moving, which dramatically slows algae growth and makes the bath more attractive to birds at the same time.
Fixing the common problems
The basin leaks
If water disappears faster than evaporation can explain, you have a leak. Fill the basin, mark the water level, and watch it for a few hours on a cool day (to rule out evaporation). If the level drops, empty the basin completely and let it dry fully. Then run a thin bead of aquarium-safe silicone sealant along any visible cracks on the interior. Let it cure for 24 hours before refilling. If the crack is structural (running all the way through a thick section), the fix may only be temporary and you may need to re-cast the basin.
The basin tips or wobbles
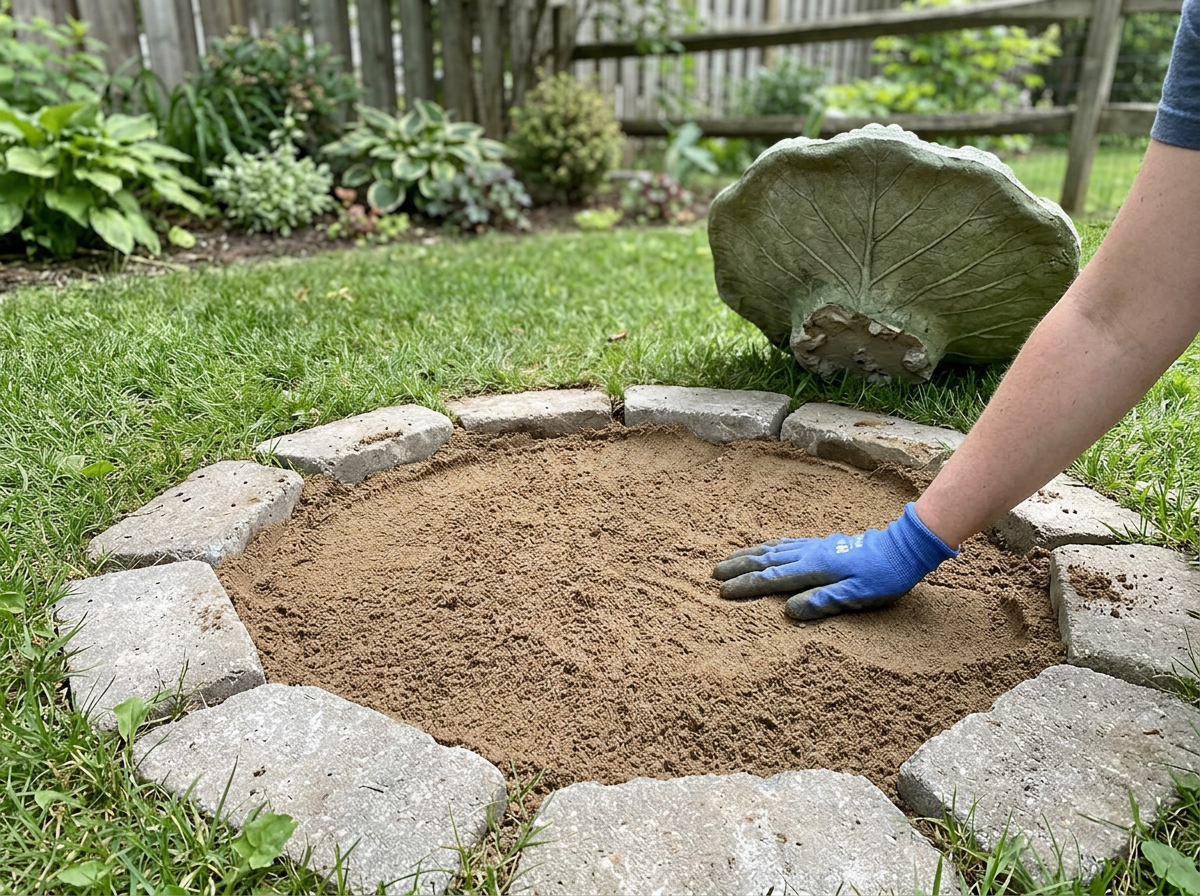
Hypertufa and concrete basins are heavy once cured, but uneven bases cause tipping. If your basin rocks, re-level the base rather than shimming the basin itself. A bed of sand under the base is the easiest fix: pour 2 to 3 inches of coarse sand, set the base on it, and adjust until it's stable and level. For a stump base, check that the top face is flat and not rotting. If the stump is degrading, switch to a flat-top concrete block or a purpose-made pedestal.
Algae buildup is constant
Algae loves shallow, warm, sun-exposed water. The two best controls are: clean more frequently (weekly at minimum) and add shade. If your bath is in full afternoon sun, move it to a spot with dappled morning sun and afternoon shade. The leaf-vein texture of the basin can trap algae, so use a stiff-bristled brush (an old toothbrush works great for the veins) during weekly cleanings. A solar water wiggler also helps because algae prefers still water. how to fix the bird bath in virtual families
Cracking and weathering over winter
Concrete and hypertufa are porous and trap water inside. When that water freezes, it expands and cracks the material. If you're in a climate with hard freezes, bring the basin indoors or store it in an unheated garage for winter. At minimum, empty it before the first freeze so there's no standing water to expand inside the material. Small surface cracks that appear after a cold season can be patched in spring with the silicone sealant method above.
Debris and mess in the basin
Leaves and debris fall into open basins, especially in autumn. You can't fully prevent it, but placing the bath away from directly overhanging trees reduces the load. A quick dump-and-refill is usually faster than trying to fish debris out. If mess is a constant issue, a simple fine-mesh net draped over the bath when it's not being actively used works, though birds won't use it while the net is on.
Getting birds to actually use it
Building the bath is only half the job. Getting birds to discover and trust it takes a little patience and a few practical moves. The biggest factors are location (covered above), water movement, and consistency.
Water movement is the single most effective attraction trick. Birds detect water by sound, and a dripping or trickling sound carries further than you'd expect. A simple drip system, a solar-powered fountain head, or even a gallon jug with a small hole in the bottom hung above the bath will create enough movement and sound to pull birds in from across the yard. Once one bird finds it, others follow.
Keep the water fresh and the basin clean on a consistent schedule. Birds are creatures of habit. If your bath is reliably clean and full every morning, birds will build it into their routine. If it's dry or murky half the time, they'll find somewhere else.
If you're also running a feeder nearby, coordinate the two. Chewy's guidance notes that placement relative to feeders matters: putting the bath near (but not directly under) a feeder means birds who come to eat will also discover the water. A distance of about 10 to 15 feet from the feeder is ideal: close enough for easy access, far enough that seed hulls and droppings from the feeder don't fall into the water.
Patience is part of it too. In a new garden or in early spring, it can take one to three weeks for local birds to start using a new bath. Don't move it around during that period. Once birds find it and start using it, the location is set. Moving it will reset the clock.
Real leaf vs. bowl mold: a quick comparison
| Factor | Real Elephant Ear Leaf Mold | Large Bowl Mold (no real leaf) |
|---|---|---|
| Cost | Low (leaf is free if you grow the plant) | Low to moderate (depends on bowl) |
| Appearance | Highly natural, detailed vein texture | Smooth or lightly textured, less organic |
| Bird grip/footing | Excellent (vein texture is natural non-slip) | Good with added pebbles, less inherent texture |
| Difficulty | Moderate (leaf prep, timing the mold) | Easy (just press mix into or over bowl) |
| Seasonal availability | Spring through fall only in most climates | Year-round |
| Durability | Same as any concrete/hypertufa basin | Same as any concrete/hypertufa basin |
| Best for | Gardeners who want a natural, one-of-a-kind piece | Anyone who wants a quicker build or lives outside elephant ear growing zones |
If you have access to a large elephant ear leaf, use it. The texture payoff is real and birds respond well to it. If you don't, the bowl-mold version with added river stones works just as well functionally. The birds don't care about the aesthetics as much as the depth, texture, and cleanliness of the water.
Your next steps right now
If you have an elephant ear plant in your garden, go cut a large leaf today. Set it up on your mound mold and mix your concrete this weekend. If you don't have a leaf, order hypertufa mix or Portland cement and perlite online, and use a wide plastic bowl as your mold in the meantime. Either path gets you a finished basin within a week.
While the basin cures, do your leaching cycles so it's pH-safe by the time you're ready to place it. Pick your spot: open sightlines, a perch nearby, morning sun and afternoon shade if possible. Add pebbles, fill to 1 to 1.5 inches, and add a drip or wiggler if you want birds to find it fast. Then commit to the weekly cleaning routine and the bath will keep working season after season.
FAQ
Which side of the elephant ear leaf should face the water when I make the basin?
Use the mold upside down so the leaf's cupped underside forms the inside surface, then press the concrete or hypertufa firmly enough that veins imprint cleanly. If the leaf detail looks shallow, you can smooth the mix surface once it reaches peanut-butter thickness, then re-press before it starts to set.
Is it safe to handle elephant ear leaves, and do I need to worry about residue in the finished bath?
Even if the finished bath is meant for birds, avoid leaving the raw leaf or plant material outdoors where pets can access it. Wash hands after handling, keep the leaf in a sealed bag while you work, and do not let any leaf pieces fall into the mix or inside the finished basin.
How do I measure the right water depth once I add river stones to the bottom?
Aim for finished water depth, not basin height. The effective depth changes once you add pebbles and after any shrinkage from curing, so dry-fit the stones first, then fill and confirm you can consistently reach about 1 to 1.5 inches deep in the center.
My bath looks good, but birds won’t use it. What should I fix first?
A quick check is to watch bird behavior for a few mornings. If they stand at the edge but do not step in, the water may be too deep, too soiled, too still, or too exposed to predators. Resolve one variable at a time, usually start by cleaning, reducing algae, and improving visibility and nearby perches.
How can I tell I rinsed the bath well enough after disinfecting?
Do not leave cleaner on the surface. For vinegar or hydrogen peroxide routines, always do a long, thorough rinse (multiple fills and dumps if needed) until there is no strong vinegar smell or any slippery residue, then allow it to air dry before refilling.
What’s the best way to troubleshoot a concrete or hypertufa bath that keeps losing water?
If water disappears faster than evaporation, treat it like a leak. After emptying and drying, seal only visible interior cracks with aquarium-safe silicone and let it cure fully (about 24 hours) before refilling. If the basin still loses water after sealing, the crack may be structural and re-casting may be the most reliable fix.
Should I dump and refill daily in summer, or can I just top off?
When you top off daily, use fresh water, not “more of the same.” In hot weather, don’t just add a little, dump any remaining water, scrub if needed, then refill so biofilm is not left behind and algae has less to feed on.
How do I prevent mosquitoes if I can’t clean the bath as often as recommended?
To keep mosquitoes from breeding, refresh water on schedule and avoid long runs of stagnation. If your bath is often ignored, add gentle movement (solar dripper or wiggler) and consider partial shade, because warm, still water accelerates both algae and larvae.
Can I make an elephant ear style bird bath using only a plastic or ceramic bowl mold?
Yes, but the most common mistake is choosing a mold that creates deep pooling. If you use a bowl mold, select one that is wide and shallow when turned upside down, and test the final shape by filling with water before you commit to curing.
Is a smaller elephant ear bird bath size still effective for birds?
A small bath can still work, but too little interior space can discourage birds. As a practical guide, avoid anything under about 12 inches of finished diameter, and make sure the basin is wide enough that a bird can step, dip, and turn without feeling cramped.
What should I do when algae keeps coming back no matter how often I scrub?
If a bath is in full afternoon sun, algae and slime build faster even with weekly scrubbing. Moving to morning sun with afternoon shade, using a stiff brush for vein texture during weekly cleaning, and adding water movement together usually solves recurring algae better than any single step.
Can I use a net over the bath to stop leaves and debris, and will birds still use it?
Yes, you can cover it only when needed, but birds will not use the bath while the net is on. If you use a fine mesh net to keep leaves out, plan to remove it when birds are most active (typically morning), and clean the basin promptly after debris collects.
Next Articles

How to Make a Bird Bath: Step-by-Step DIY Builds
Step-by-step DIY bird bath builds with materials, base and bowl setup, correct height, filling, and easy cleaning tips.
Do It Yourself Bird Bath Plans: Simple Bath to Fountain
Build simple DIY bird bath or fountain with materials list, step-by-step plans, placement, maintenance, and winter tips.
How to Fix the Bird Bath in Virtual Families
Fix a nonworking bird bath in Virtual Families with quick steps, interaction checks, placement tips, and next troublesho